
Repairing Diaphragm Pumps
by David Pascoe
This is our follow up to the Repairing Rotary Vane Pumps. The repair of diaphragm pumps is no more difficult than other types. In fact, it's usually a bit easier.
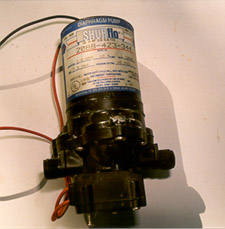
There are two basic style pumps found in common use that look very different, but utilize the same principle of a series of alternating diaphragms. These are the PAR (acronym for the original designers, Peters and Russell) and that represented by the Shurflo type pump shown below, which is a fresh water system pump. The PAR type pump also comes in bilge pump models.
Solve the Cause of Failure First
People are always complaining about the unreliability of these pumps due to their history of frequent breakdowns. In fact, these pumps are reliable when installed properly, but frequently they are not. There are three main problems that usually cause their demise.
1. They are located in a place that gets wet.
2. Diaphragm pumps are intolerant of any kind of debris in the water being pumped.
3. Freezing as a result of inadequate winter layup.
The first problem should speak for itself; all pumps are electrical apparatus that should be located in a clean, dry area. Note that just replacing a water damaged pump isn't going to solve the problem. You need to eliminate the reason why it got wet.
The second problem is one that can be solved by installing the appropriate sized strainer or filter so as to prevent debris from getting into the inner workings of the pump. By far -- as in the case of the example below -- the primary mode of failure of water pressure pumps comes from aluminum water tanks. Aluminum tanks will build up very heavy corrosion deposits on the inside of the tank. These deposits look like very little stones, and it is these that get into the diaphragm valves and cause their malfunction.
The Shurflo pump
In the case of this Shurflo pump, when we took it apart, the diaphragm assemblies looked like they were clogged with fine gravel. This is what prevented the pump from working. In fact, this pump did have a strainer in the line between pump and tank. Unfortunately, the strainer mesh was so coarse that it permitted these finer particles to pass through it. Therefore, the solution for use with aluminum tanks is to use a very fine mesh strainer and this sort of thing will be prevented.
Repairing the Pump For the Shurflo pump, the hardest part of repairing it is getting it back together after taking it apart. It's somewhat like taking your watch apart, although not quite that bad.
When you remove all the screws from the outer housing and pull it apart, there is a U-shaped lever that is operated by a diaphragm. It is tensioned so that when you pull the outer housing off, it will want to fly away. Remove the cover VERY SLOWLY, and once it is off, take note of the position of this U-shaped lever. Write it down on a sheet of paper so you don't forget, because if you do, you'll have a hard time getting it back together, for its positioning will not be clear to you. This is the lever that is part of the pressure switch that turns the pump off, so it's important to get it right.
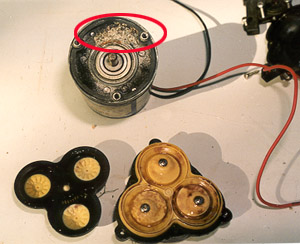
The main components. Notice also that this motor got wet, but not enough to damage it.
Okay, that's the hard part and everything after this is (or should be) easy. As you can see in the photos here, there are actually two problems with this pump. Not only is it clogged with debris, but the motor got some water into it. We cleaned up the corrosion and the bearings the same as outlined in the Repairing Rotary Vane Pumps. Putting it back together, we tested it on a battery and proved that the motor was working fine.
Next, onto the pump itself. This was real easy. Pulling out the remaining screws, the diaphragm assembly comes apart and goes back together easily. Here the debris of aluminum oxide particles is plainly apparent. All we had to do was to use an ice pick or awl and pry the little particles out of the grilles in the diaphragm housings. We then check the various parts for wear or damage. There being none, we then ready to put it back together.
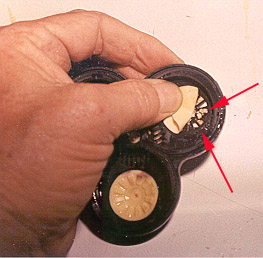
The culprit: Aluminum oxide from an aluminum water tank clog the diaphragm valves. The repair simply requires removing this debris.
So what if there is damage or wear? Not to fret, replacement parts are available for nearly all popular brand pumps. From your nearest boating center? Uhm, no. Esoteric parts like this are usually only available from marine parts distributors or suppliers. Fortunately, such parts are now becoming widely available to consumers through distributors, many of which can be found online. Large distributorships carry a huge array of replacement pump parts.
Another thing we should point out is that replacement motors are also now available at reasonable prices. We're talking like $30-$40 rather than the $90-$100 prices of ten years ago. This can definitely make the repair of a $150 pump worthwhile, yet alone a $300 pump.
When putting the pump back together, be sure to torque all the screws snugly. Then go back and make sure that each screw has the same approximate torque on it so that the more delicate plastic housings don't get distorted by uneven torque. That's all there is to it.
PAR pumps, although they look very different, really operate much the same. In this case, the motor uses a drive belt from the motor to actuate a cam that actuates the diaphragms. With this pump, there's no difficulty at all taking it apart, for the manner in which it is assembled is very clear.
The diaphragms in this pump are prone to wearing out, as well as being damaged by debris. Here you need to look each of the removable diaphragms over and check the neoprene parts for cuts, splits or damage. The damaged ones need to be replaced. If the pump is old, it's best to order and replace the complete set of four. And get a couple of spare drive belts while you're at it.
If you don't have a strainer on the intake line, it's time to install one. And be sure to get one with a fine, not coarse mesh.
Finally, if you are using a dockside water pressure connection, be aware that if the reducer regulator or the check valve in the system aren't functioning properly, this will cause the pump to be subjected to high pressure. This can damage the diaphragms. So, if you are having a chronic problem with pumps failing frequently, you should check to see that these two devices are functioning properly.
One way you tell for sure that the check valve is not functioning (or there is no check valve or reducer valve in the system) is when the hoses connecting to the water pump are ballooning out from excessive pressure. If you have ballooning water hoses, you got a problem that needs to be corrected immediately.
Companion article: Repairing Rotary Vane Pumps.
Posted March 28, 2000


 Visit davidpascoe.com for his power boat books


David Pascoe is a second generation marine surveyor in his family who began his surveying career at age 16 as an apprentice in 1965 as the era of wooden boats was drawing to a close.
Certified by the National Association of Marine Surveyors in 1972, he has conducted over 5,000 pre purchase surveys in addition to having conducted hundreds of boating accident investigations, including fires, sinkings, hull failures and machinery failure analysis.
Over forty years of knowledge and experience are brought to bear in following books. David Pascoe is the author of:
In addition to readers in the United States, boaters and boat industry professionals worldwide from nearly 80 countries have purchased David Pascoe's books, since introduction of his first book in 2001.
In 2012, David Pascoe has retired from marine surveying business at age 65.
On November 23rd, 2018, David Pascoe has passed away at age 71.
Biography - Long version